I love the new Server Manager, part 1

DISCLAIMER:
This article contains some information from Windows 8. Windows 8 is currently in beta and there’s no guarantee that the final product will behave the same or contain the same features. Nothing in Windows 8 is final and everything is subject to change.

Hello.

There is no doubt: I love the new Server Manager in the Windows Server 8 beta, which will be named Windows Server 2012 at release. The main reason for this is that it takes a huge step towards centralized management, and there is no problem whatsoever to manage several servers from a single Server Manager console.

In the dashboard, which is the default screen after launching the Server Manager, you can see the status of one or several servers at a glance, and on the top, right corner you have the common menues which also changes slightly depending on which server you highlight, I’ll come back to that one later. The Flag-icon will light up yellow or red if there is a warning or error with any tasks running. The “Manage” menu allows you to add or remove roles and features from any server you have in your servermanager. Oh yes, you can remotely add and remove any roles or features from 1 single location on 1 single computer! 🙂 Also you can apply the changes to a VHD-file and use this to apply these changes on other servers.  The “Tools” menu replaces “administrative tools” from the previous versions and here you find the tools you use to manage the different server roles and this menu changes depending on which server you have chosen. So when you have select a domain controller you’ll see the different tools for administrating AD, but if you then select a file servers those tools are no longer present on that menu.On the left side you can select the dashboard, local server, all servers which shows all servers you have added, and the different server groups you’ve added either manually or automatically.

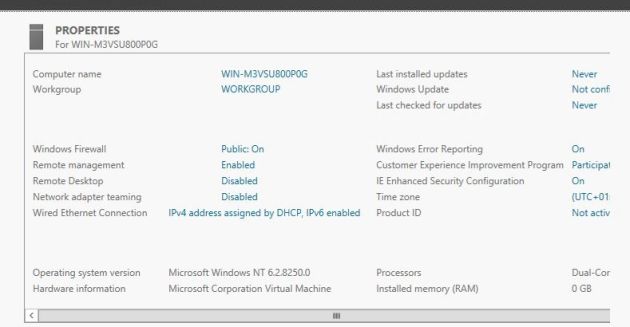
On the Local server screen you configure typical 1 time only tasks like computer name, IP-addresses, Windows Update settings, NIC teaming. These settings only apply to the local server and I have not found a way to set these on a remote server. This is however not a big deal in my opinion as these are typical pre-production settings which you rarely change after a server is set into prodution.

In part 2 I’ll go trough the really juicy part, where we look into how to manage several servers from one console.

Hyper-V limits

A quick list of the limitations to Hyper-V as of Windows 2008 R2:

Hyper-V host:

  • Virtual CPUs: 512
  • Maximum Memory:  32GB (standard), 2TB (enterprise and datacenter)
  • VMs pr host: 384
  • Storage: Limited only by Windows
  • Network Interface Cards: Limited only by Windows

Virtual Machine:

  • Virtual CPUs: 4 (if the host has at least 4)
  • Maximum Memory: 64GB
  • IDE drives: 4 (Remember the vm must boot from a IDE-attached VHD file)
  • SCSI drives: 256 (up to 4 scsi-controllers with up to 64 drives each)
  • VHD limit: 2 TB
  • Total storage (VHDs): 520 TB (260 drives on 2 TB each) + any pass-though drives
  • Pass-through drives: Number and size limited by Windows only
  • Virtual Network Interface Cards: 12 (8 synthetic and 4 legacy)

The magic of CSV

Ah, the lovely feeling inside when you start to plan a Hyper-V environment with servers, clusters, network and storage. 🙂 There are so many things to think about, to plan, to set up, to test and to fix. In the enterprise Hyper-V in Windows 2008 came really short in my honest opinion since it was a pain to cluster. As you may know, cluster nodes are assigned storage in LUNs, and only one node can access any given LUN at the time. This means that when you store virtual machines and their data on a LUN then you have to migrate everything on the LUN from one node to another node when you migrate the virtual machine. So to make the virtual machines independent of each other you have  to make a separate LUN for every single virtual machine in the cluster! At only 50 virtual machines the administrative tasks are getting a little out of hand.

But in Windows 2008 R2 we got CSV which is short for Cluster Shared Volumes (not comma separated values). This is a new cluster storage type which simply enables several virtual machines to access their VHD files on the same LUN and still operate, or move between, different cluster nodes independently. That’s the basic desciption and there are more detailed information here: http://technet.microsoft.com/en-us/library/ff182346(WS.10).aspx

Some benefits include

  • You need far less LUNs (obviously)
  • Every LUN needs some space to allow for datagrowth in the virtual machines. With fewer LUNs you’ll make much better use of your available storage space
  • The path to the CSV is stored under the folder \ClusterStorage under the systemdrive and it’s the same path regardless of which node you’re looking from. So tracking the paths are easier now
  • Virtual machines can still fail over and move between cluster nodes independently
  • You can set up some clever designs, for example where the system drives, data drives and page files to the virtual machines are placed on separate physical sotage solutions (and LUNS) for performance gains without having to implement a jungle of LUNs.

CSV are available in all editions of Windows Server 2008 R2 that includes Failover Clustering, as well as Hyper-V Server 2008 R2. Also notice that putting other clustered resources on CSV is not support, it’s for virtual machines only.

Hyper-V virtual hardware options

In the Hyper-V console you can find a few options regarding the virtual hardware of each vm and there are several nice features you all should know about. Let’s begin with synthetic and emulated devices.

Emulated devices (aka legacy devices) are the more traditional virtual hardware which is supported by pretty much any OS out of the box. It still uses CPU cycles on the host to emulate a hardware and transfer its I/O. The synthetic devices (aka Enlightened devices) are new virtual hardware designed to be much more efficient on virutal machines than emulated devices. It performs way better as it transfers I/O directly to the vmbus instead of emulating a device in between, but the operating system needs the Hyper-V integration software to detect synthetic devices. In short, emulated has better compatibility but synthetic gives better performance.

This explaines why the harddrive containing the OS in a vm must be an IDE drive. IDE drives in Hyper-V are emulated at boot, but can transition seamlessly into synthetic devices. SCSI controllers are synthetic only and is therefore not visible for the guest OS until the Hyper-V drivers has been loaded. In performance there are no practical difference between an IDE drive and a SCSI drive in Hyper-V, but you can hot-add disks on the SCSI controller.

While we’re on virtual hard drives. The VHD files can be set up in 3 different ways in Hyper-V: Fixed size, dynamically expanding, and differencing disks.

  1. A fixed size VHD will allocate all space when the file is created, so if you create a 50GB fixed size VHD the files will be 50GB in size even if it only conaints “free space”. The advantages is that this file will unlikely be fragmented and perform slightly better than dynamically expanding disks. Fixed size disks are recommended for production environments. The obvious downside is that you always will allocate space which isn’t spent.
  2. Dynamically expanding on the other hand will only allocate the space which is used by data inside it, and allows you to utilize the storage capasity much better. Though these drives doesn’t perform as well as fixed drives since it has to spend disk writes to expand the file when data is added. Also you will likely end up with defragmented VHD files. But for testing purposes this is a very good option to increase what’s called the “vm density” (I smell a later blog post about that). Just be very careful that the VHD files has space to grow or you risk bringing all your vm down all of a sudden when your physical drive has no space for growth.
  3. Differencing disks is that you set up a “parent disk” and then create other “child disks” that uses the parent as a reference. All changes from parent disks are stored in the children. This configuration is seldom used for other than testing purposes as failure on the parent disk will make all children disks unusable.

In addition we have pass-through disks which connects a volume directly to the vm and not as a vhd-file. This gives by far the best performance, but the disk is completely assigned that particular vm and can’t be accessed by any other vm or the host.

RemoteFX is a new feature in Windows Server 2008 R2 Service Pack 1. It is a virtual display adapter that enables what Microsoft calls “Rich desktop experience”, which means high-end graphics in a vm and over RDP. The graphics are virtulized in the display adapter. This requires support in the graphics driver and you’ll usually need an enterprise version display adapter from Nvidia or ATI.

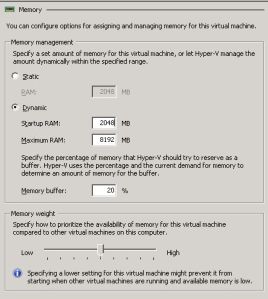
The amount of memory assigned to a vm can either be static, or as of Windows Server 2008 R2 SP1 it can be dynamic. By selecting dynamic memory you can assign amout of memory the vm shall have at boot, and the maximum amount of memory it can allocate. There is also a slidebar used to determine the priority the vm has when several vms has to assign memory between themselves.

CPU Cores is prettystraightforward. It is the amout of logical CPU cores the vm has installed. I’ll come back to about the pros and cons of assigning a vm one or more cpu cores. Here you can also reserve CPU power to the vm so it’s guaranteed some resources, and you can also limit the amount of CPU power by percentage the vm can load the host with.